
Look and Sound Professional on Video — Even With Just Your Phone
Getting Started
Whether your organization sent you this, or you just want to look and sound as professional as possible on camera, this guide will show you how to make a handful of small decisions the right way — decisions that make a real difference between a video that looks amateur and one that looks genuinely polished, even filmed on nothing but a phone.
This isn't a full course on video production — think of it as a short, practical walkthrough: where to sit, how to set up your phone, how to get good lighting, and how to sound clear, all using things you probably already have.

Most of what's covered here are best practices that work in almost any situation. A few things depend on what your organization specifically wants — orientation, background, clothing, and whether to mount the camera or hold it. We'll flag those as they come up so you know to check in.
1 — Room / Location Choice

Pick a room that isn't too small, and isn't a large room that's completely empty — both create echo. A simple test: stand in the room and talk out loud. If you can hear an echo yourself, the camera's microphone will pick up even more of it. Rooms with soft surfaces — furniture, bookshelves, curtains, rugs — sound better than bare ones. A bathroom is the worst-case example: hard tile, close walls, nothing to absorb sound.

While picking your room, also check for two things you'll need later: a big window that lets in ambient light, and enough open space to work with — some distance between you and the camera, and ideally some distance between you and whatever's behind you too.
2 — Camera Choice & Stability
Now let's talk about what you're actually going to film with. For most people, that's just your phone, and that's fine — it's already set to automatic focus and exposure. A camcorder works too, but only if you already know how to use its automatic mode.

Default to mounting your camera — a tripod, a stack of books, anything stable — rather than holding it.

This matters more the longer your video runs; anything over 30-60 seconds will start to show drift and fatigue if handheld. Holding the camera can work for something short, like a quick testimonial, but only if you can keep it steady, at eye level, and at the right distance the whole time. Mounting will always look more professional. If you're unsure which way to go, check with your organization.
3 — Camera Placement (Distance & Framing)
You'll look more natural on camera the farther back it is, as long as you zoom in to compensate — this is why we asked you to check for extra space earlier.

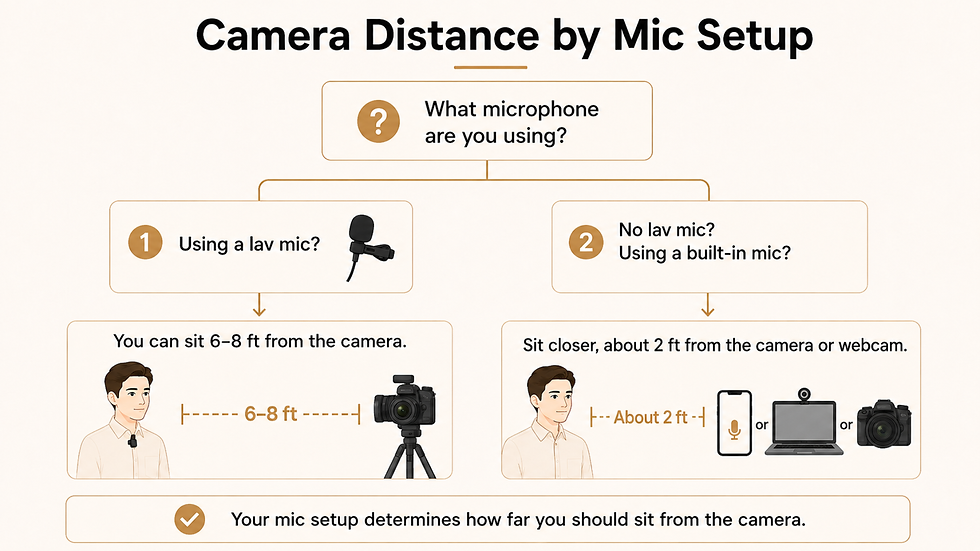
Most DIY video is shot a foot or two from someone's face, which slightly distorts your features. If you have the room, back the camera up to around 6-8 feet and zoom in to frame properly.
One important note before you lock in that distance: it assumes you're using some kind of microphone — a clip-on mic or a boom mic — not your camera's built-in mic. If you end up using wild sound instead, you'll want to sit closer than this. Hold off on finalizing your exact distance until after the Sound section below.
This is also where the extra space behind you comes in. If you can, leave some distance between yourself and whatever's behind you — a wall, a shelf — rather than sitting flush against it.

That gap softens the background and helps you stand out from it. Realistically, not every room allows all of this at once. If you have to choose, prioritize good light and clear sound first — those matter more to how professional the video feels than hitting the exact ideal distance.
Frame the shot from roughly mid-chest to a little space above your head — a medium shot.

Within that frame, your eyes should sit in the upper third, not dead center (the rule of thirds).

Make sure the camera itself is level with your eyes — not looking up or down at you.

4 — Format — Portrait vs. Horizontal
Whether to film vertically or horizontally depends on where the video will be used.

Check with your organization — everything else covered here (distance, framing, rule of thirds) works the same either way.
5 — Lighting
Lighting is one of the biggest things separating a professional-looking video from an amateur one, and you probably don't need to buy anything to get it right. This is why we asked you earlier to pick a room with a big window. Natural window light is genuinely great light when used correctly — the bigger the window, the softer and more flattering the light.

Face the window directly so the light hits you head-on.

Don't let the window sit off to the side, and don't let it sit behind you — that creates a silhouette effect. Avoid direct sunlight beaming straight through the window and hitting you; you want the soft, ambient light in the room, not a hard beam.

A good starting point is sitting about 6-8 feet from the window — and this is intentionally the same distance as your camera distance. In this setup, the camera sits as close to the window as the room allows, essentially placing the camera and the window in roughly the same spot. That's why both numbers land on 6-8 feet: you're not measuring two unrelated distances, you're positioning yourself 6-8 feet from a single light-and-camera cluster near the window.
If you have a studio light or softbox, the window matters less — position it about 30 degrees above your eye line and 30 degrees off to the side of your face for natural-looking shadows.

6 — Sound
Bad audio hurts a video more than imperfect video does. You have two options: "wild" sound (your camera's built-in mic, no extra gear) or a lav mic — an inexpensive wireless clip-on mic that plugs into your phone, clipped near your collar.

This is the section the Camera Placement section told you to wait for. If you're using the farther-back 6-8 ft camera setup, you need a lav mic — at that distance, a built-in mic sounds distant and picks up too much of the room.

Without a lav mic, sit closer instead — close enough for the built-in mic to hear you clearly, generally within about two feet. Once you know which applies to you, go back and lock in your actual camera distance.
7 — Clothing
Avoid busy patterns — thin stripes, tight checkers — which can create a flickering effect on camera. Avoid solid white (overexposes/glows) and solid black (loses detail, looks flat). Skip big logos or visible brand names. As always, check with your organization if they have specific clothing preferences.

8 — Preparation (What to Say)
This depends on what you were asked to do. If you were given an exact script, your job is to deliver those words — but practice until they feel natural and comfortable, not recited. If you were asked to speak in your own words, internalize the ideas rather than memorizing a script — think through your key points and get comfortable with the meaning, not the exact wording, so you're genuinely thinking as you speak.

Either way, cue cards are a fine safety net, but practice with them until you're not really reading them — just glancing to stay on track. If you're leaning on the card to supply the actual words in the moment, that's a sign you need more practice, not a fuller script.

If you use cue cards, place them directly behind the camera, just above the lens — not off to the side, where your eyes will visibly dart sideways.

How noticeable your glance is depends on your camera distance: at the farther-back setup, the upward glance is barely noticeable; sitting closer (for example, using wild sound instead of a lav mic) makes it more noticeable, since your whole head has to tilt. If that's your situation, lean toward internalizing your key points instead of relying on cue cards.

9 — Delivery / Speaking Style
Talk like you're explaining something to a person in front of you, not presenting to an audience. Give yourself permission to pause — a short pause to think or breathe reads as natural and confident, not as a mistake. Rushing is what actually sounds off. If you mess up a line, pause, take a breath, and redo it — leave a beat of silence first so it's easy to cut cleanly in the edit.

10 — Before You Hit Record — Final Checklist
Silence your phone or turn on Do Not Disturb. Check the room for anything that might make noise — fans, doors, background hums. Record a short test clip (about 20 seconds), play it back, and check both picture and sound. If you have someone available to help, have them keep an eye on things while you record. Don't be afraid to do a couple of takes, especially for anything important.

11 — Sending Your Footage
Check whether your organization already has an upload link set up. If not, most production companies can provide one on request — that's how we do it at Intrigue Studios: a single link, you drop your file in. Otherwise, use a proper file-sharing method like Google Drive, Dropbox, or WeTransfer.

Never send the file by text message, iMessage, or email — these often compress video automatically and noticeably reduce quality.

Always send the raw, untouched original — don't let your phone optimize it, and don't run it through any app that edits, shrinks, or filters it first.

Your editor needs the original to color-correct, clean up audio, and edit properly; a compressed file has already lost information that can't be recovered.
Well that's everything. If you need any further clarification on any of these specifics, just go back and review those sections again.
Good luck!
This guide was created by Intrigue Studios to help self-recorded footage look and sound as professional as possible. Before filming, always check with your organization for any specific requirements that may differ from these guidelines.
For project-specific questions, contact your organization or your Intrigue Studios project contact.